Hi. This must be the last job on my Tesla Coil build. I need to make an earthing point on the main Tesla coil body. Most of the earth leads in my Tesla are connected to the earthing point on the neon transformer. These are
1. Connection to the strike rail underneath the primary coil perspex covering disc.
2. Connection to the lower terminal on the secondary coil.
3. Connection to the central rail on the Terry filter.
So I need to connect this point to my earthing plate on the conservatory wall. I could just run a wire from the earth plate through one of the vent holes in the Tesla base to the earth terminal on the neon transformer. The problem with this solution is that it would be impossible to remove this lead as the ring terminal needed on the end of the wire will not pass through the vent hole. Even if I enlarge the vent hole it would still involve removing one of the perspex walls of the base unit to attach/detach this wire.
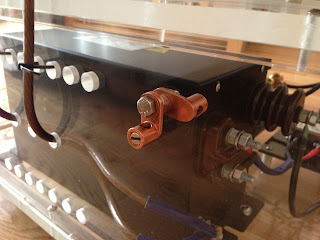
After some thought I decided to fit an earthing point on the outside of the back perspex wall of the main Tesla unit. This would consist of 2 copper terminal lugs, one mounted inside, one mounted outside, connected through the perspex by a M6 bolt.
Above is the hardware for the terminal, I will probably replace the stainless M6 bolt with a homemade copper stud but will need to procure an M6 die first.
I made a small lead that finishes in a ring terminal to connect to the new earth point. I fitted the lead to give me a better idea where to site the hole for the terminal.
Marked up the point to drill the 6mm hole. I drilled the hole freehand, there were no obstructions and it was pretty easy to keep the drill at right angles to the perspex.
Result was a nice neat 6mm hole. My OCD placed it on the centre with the vent holes and level with the end of the neon transformer.
Here's the hardware fitted. I used 2 of the copper lugs from Alan at teslastuff.com. These are the best quality electrical lugs I have seen.
The terminal was connected to the short lead from the neon transformer earth point and the perspex sidewall replaced. Job done.
If you like this blog you can show your support by one or all of these.
1. +1 my blog and email it to a friend.
2. Follow me.... It's good to know someones interested.
3. Leave a comment.... All are appreciated.


Looks fantastic- have you turned it on yet?
ReplyDelete